How to perform live boot using a DHCP server.
We need VirtualBox and the following 4 virtual machines:
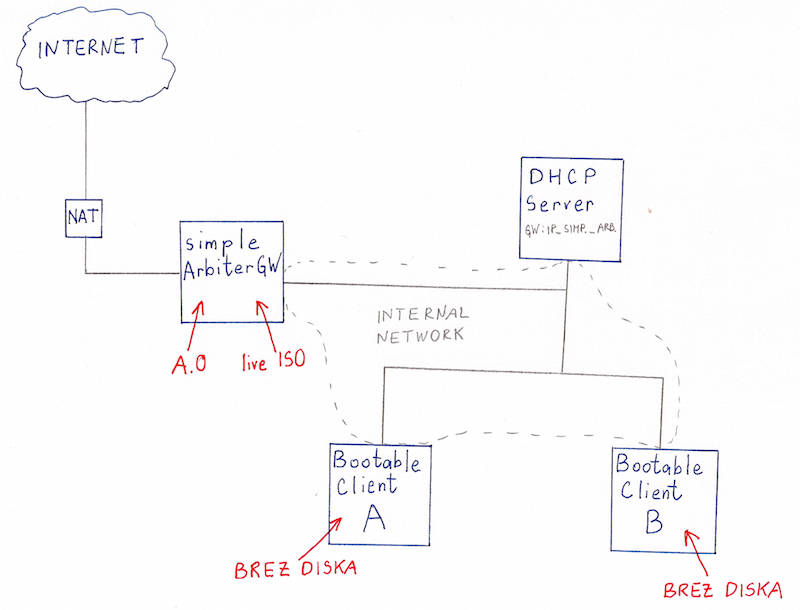
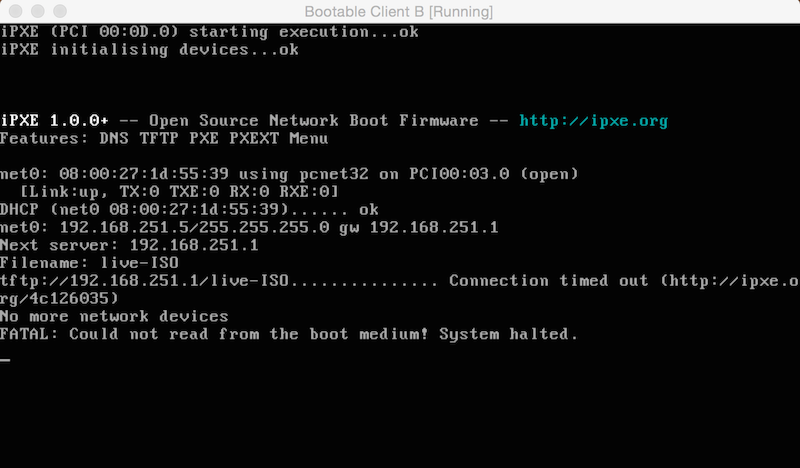
Our goal is to make BootableClient A get it's IP through DHCP server and boot up using file A, which is located on simpleArbiterGW,If we run BootableClient B machines, we would like it to retrieve it's IP through DHCP server and boot from some live ISO which is also located on SimpleArbiterGW.
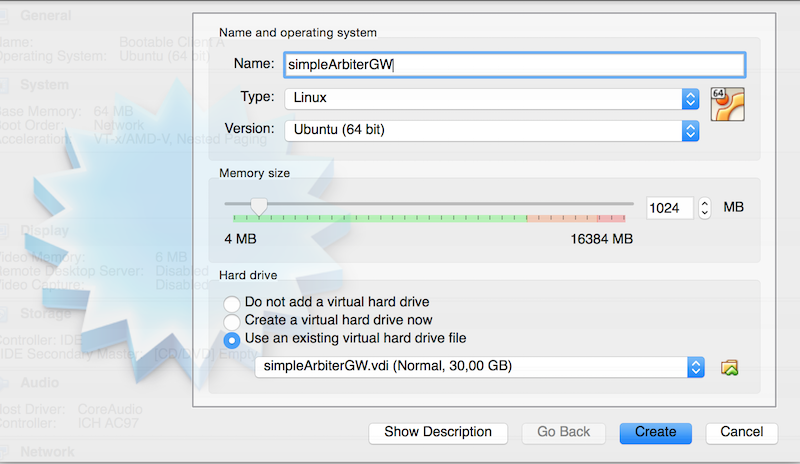
Download simpleArbiterGW.vdi and then run VirtualBox. After the file is downloaded, choose the New option in VirtualBoxu and set simpleArbiterGW in the Name field.Memory size, should be set accordingly (1gb will suffice). Then choose "Use an existing virtual hard drive file" and select simpleArbiterGW.vdi clicking Create.
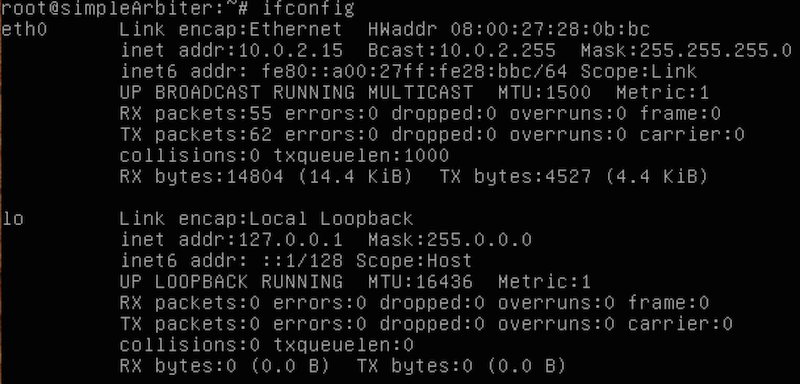
We start our virtual machines simpleArbiterGW using the following login credentials; username: "root", password: "kaboom". At the start, the computer on NAt get's it's IP(in our case 10.0.2.15).(to check this useifconfig) We now use this address and eth0 interface to access the internet.
However, we would like this machine to have 2 interfaces! One on NAT(we already have this one), and the other one on Internal Network,throuh which we will communicate wiht the DHCP Server and other machines on our Internal Network. We add a new interface, by turning off the virtual machine, select our machine in VirtualBox and select računalnik, ter v VirtualBoxu Settings -> Network Adapter 1 is already set to NAT, we set Adapter 2 to Internal Network

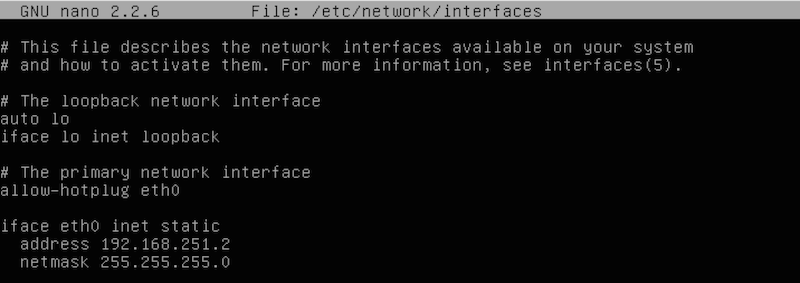
So, now we have two network interfaces!In VirtuaBox we can define multiple Internal Networks, however, for our needs two will suffice. We save the settings and restart simpleArbiterGW. What we must do now, is to assign both interfaces IP addresses. We do this by setting theinterfacesfile located at/etc/network.
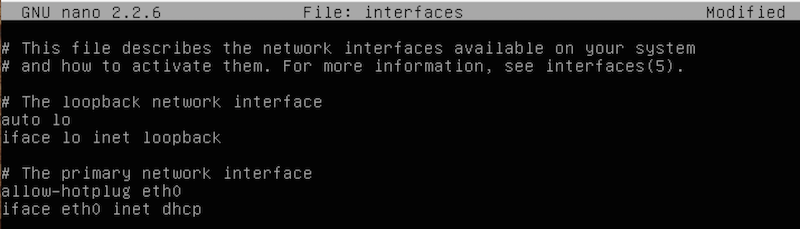
Eth0 was already handled by and integrated DHCP, so eth0 had been assigned an IP). We have to set up the other network interface. If we don't know it's name, we find it out using ifconfig -a.

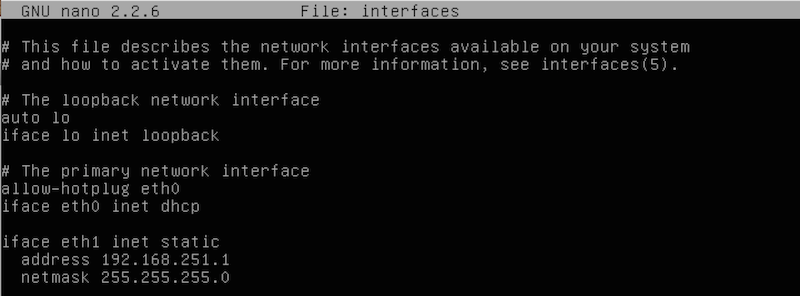
We can conclude the interface names is set to Eth1. Now we would like to assign an IP naslov to Eth1. Ifconfig could be used, but rebooting the machine would reset the settings. Which is not ideal :) So configuring /etc/network/interfaces would be a better idea. Let's make up a random local network or a local area network or local area network address and assign it to eth1.
We save the config file. Our machine still has no IP on eth1 so we use the ifup eth1 command

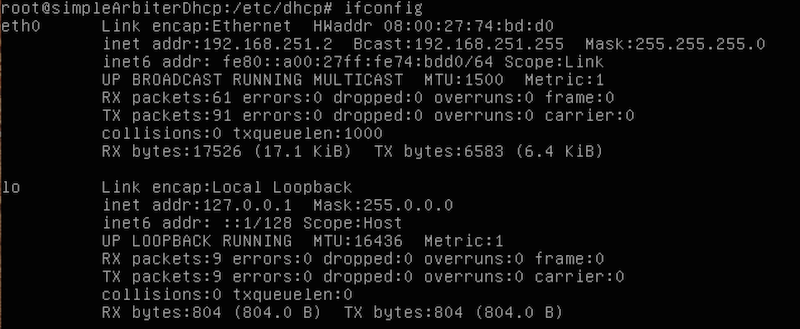
Now we use the ifconfig command, to see whether and ip is assigned to eth1 interface
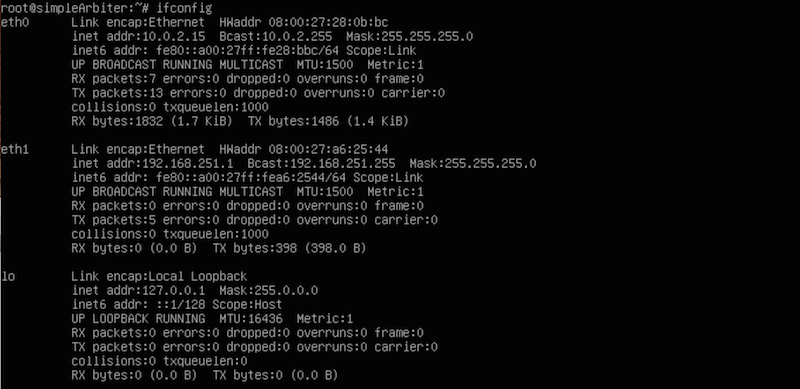
We can see the IP is set. Now let's set up the DHCP Server!
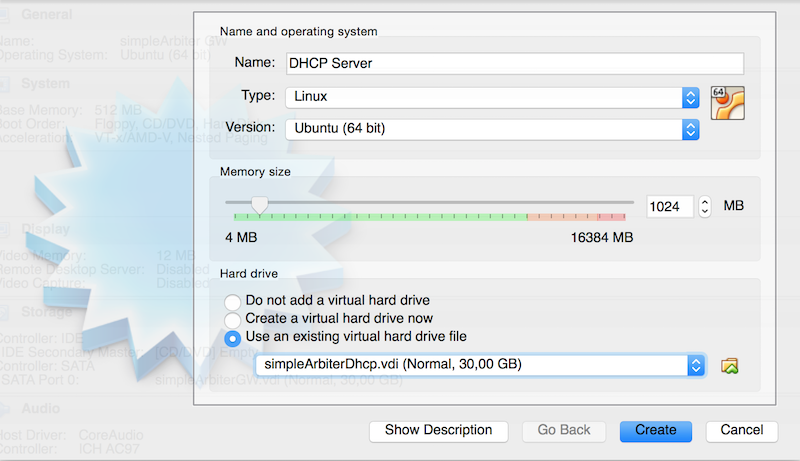
We download simpleArbiterDhcp.vdi and start VirtualBox. After the file had been dowloaded we select New in VirtualBoxu and unde rthe Name tag write DHCP Server.We set the Memory size accordingly(1gb of memory should be sufficient). We also select "Use an existing virtual hard drive file" and select the simpleArbiterDhcp and press Create.
We run DHCP Server virtual machine and login using "root" ad username and "kaboom" as password.
At first, our machine has no assigned IP, since none was set! Let+s configure it in /etc/network/interfaces.But which interface should we configure? Using ifconfig -a command, we see it's eth0interface.
Again we select our IP address.
We save the configuration file. Our computer still has no IP address assigned to eth0, so using ifdown eth0 and then ifup eth0we provide one.

Now let us use ifconfig command, to check whether there is an IP assigned to interface eth0
We got it! We install DHCP server using apt-get install isc-dhcp-server
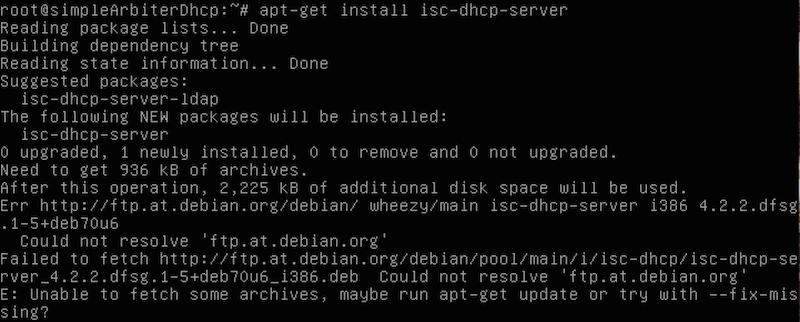
We see a bunch of errors. Why? Bacause, we have no internet access!
We need to specify the Gateway for our inteface. Our Gateway will be set as IP of our simpleArbiter virtual machine. We do this using theroute add default gw 192.168.251.1 eth0 command

Try pinging Google's DNS server at 8.8.8.8, to check if now have internet access. We do this using the ping 8.8.8.8 command.
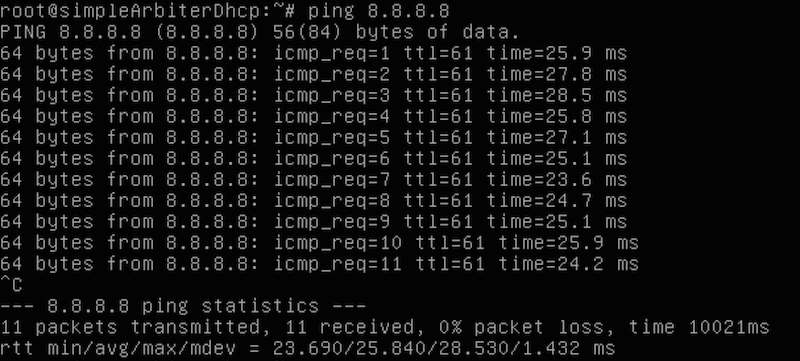
Google's DNS server is responding. Great! However, we still cannot run apt-get install isc-dhcp-server Let's tempororly add another interface and set it to NAT, so we get internet access and install the DHCP server. We add a new interface by turning off the virtual computer, in VirtualBox we select our virtual machine and then select Settings -> Network Adapter 1 has already been set to Internal Network, we set Adapter 2 to NAT

We run DHCP Server and in file/etc/network/interfaces at the end of the line add iface eth1 inet dhcp, then save the file and run ifup eth1.
Now we have access to the internet and can install our DHCP server with apt-get install isc-dhcp-server install command

Let's see what's in/var/log/syslog, which is a file where our system information is stored in.
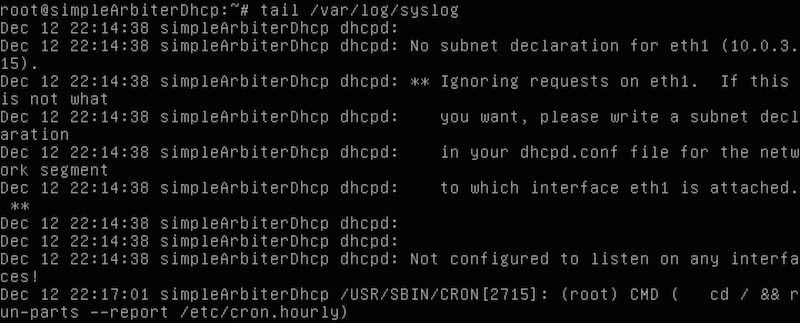
Looks like we need to set up a DHCP server and specify where it should listen! DHCP settings are stored in /etc/dhcp/dhcpd.conf. Let's set it! First let's comment out option domain-name-servers to avoid having errors.

Then we configure DHCP server, so it would serve IPs a a certain subnet. We add the following lines:
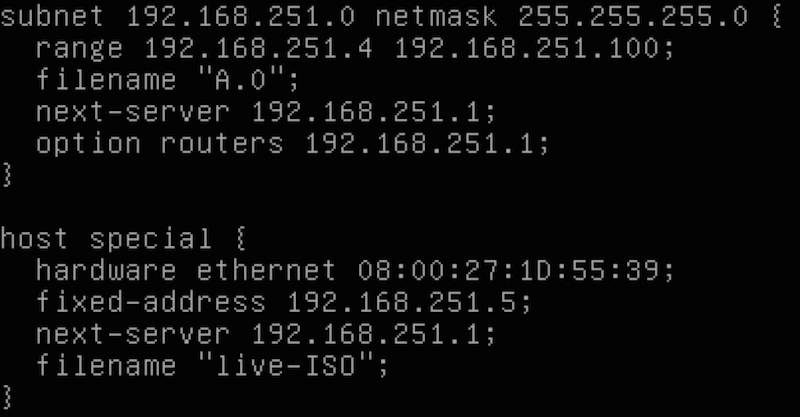
(subnet) We set the subnet and the IP range, which the DHCP server should use, and which file it should serve.
Some PXEs are so unintelligent, that you should specify where they should get the files from and to do that you specify next-server (IP from which it will be served from, in our case simpleArbiter), we also specify gateway, which, in our case is also simpleArbiter.Since we would like, that in the case of BootableClient B another file to be served, we do it by defining a special host like this:(host special) Under hardware ethernet we specifiy MAC address of our BootableClient B, we assign it a static ip and where the file live-ISO is located.We save the settings and kill the process named dnsmasqusingkilall dnsmasq.

We restart our DHCP server, to apply the new settings. This is done using service isc-dhcp-server restart command. DHCP server is now ready! We supply BootableClientA and BootableClientB and test them!
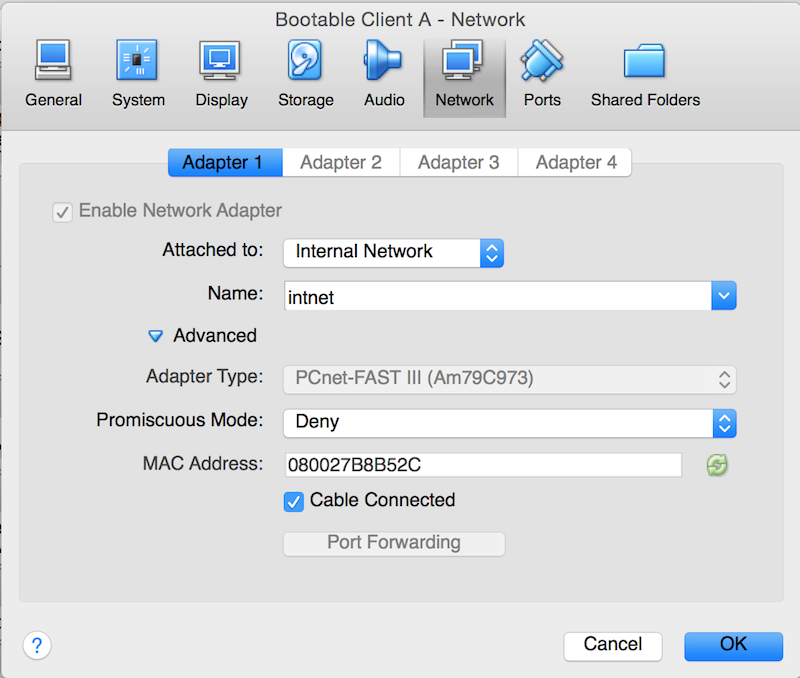
We open VirtualBox and select New, for the Name field we specify BootableClient A and for the Hard drive we select Do not add a virtual hard drive (as we want diskless device), and select Create. We want the computer to be on Internal network so vse select our Bootable Client A and select Settings->Network where we change Adapter 1 to Internal Network.
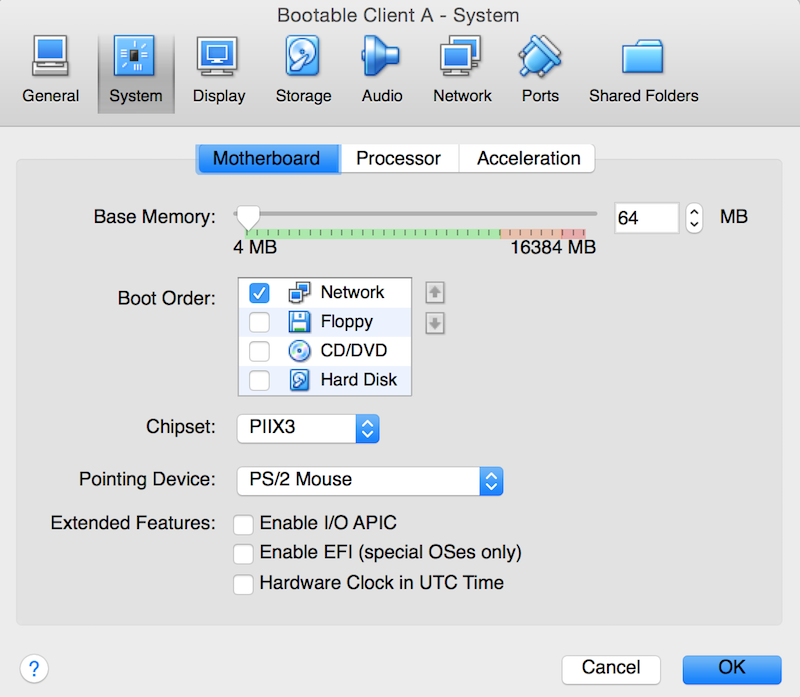
We also want our computer to boot through the network, so underBoot Ordertab select Network. We save the setting by clicking OK
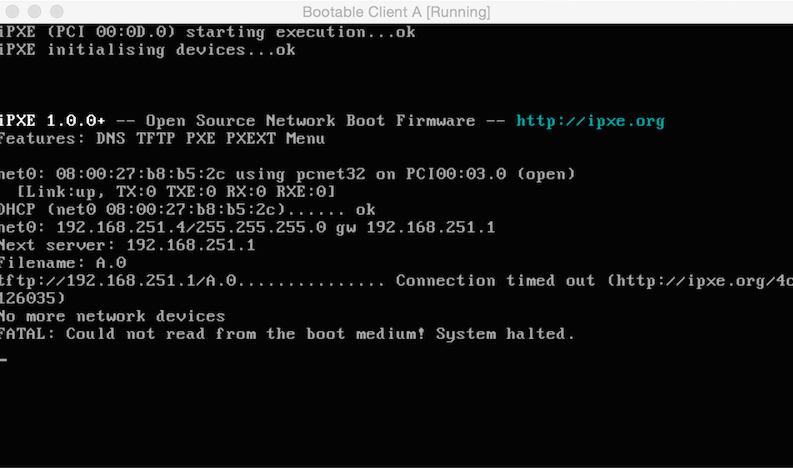
We run our BootableClient-a A and it get's it's IP(which is great), using the DHCP server and the simpleArbiter serves it exactly the file we specified. A.0
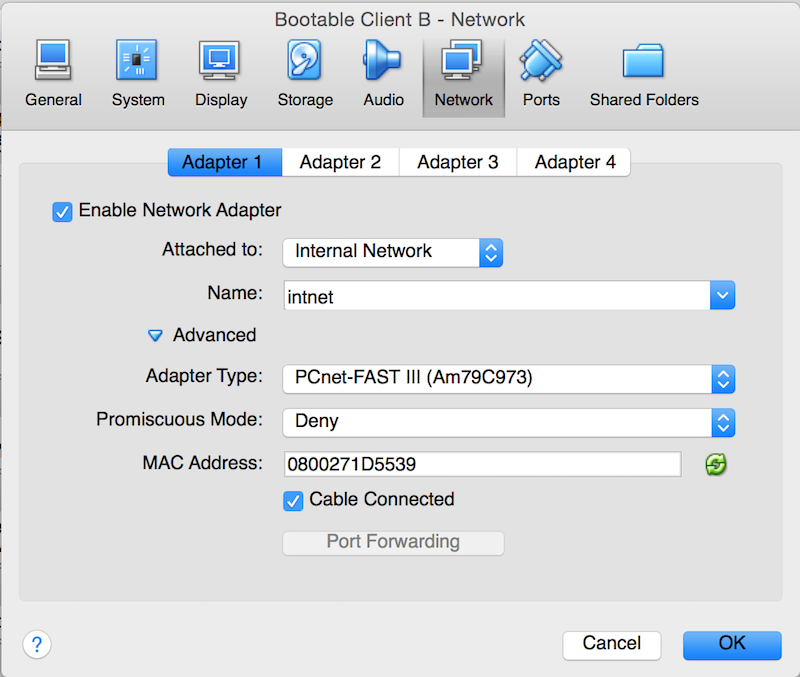
We open virtual box and select New and under the Name tag write BootableClient B and under the Hard drivetab choose Do not add a virtual hard drive (since we want a diskless machine), and then press the Create button, which will create a virtual machine. We want our machine to be connected to out Internal network so we select Bootable Client B and then select Settings->Network and set the Adapter 1 to Internal Network. Under MAC Address we specify the same MAC address that is specified in the (dhcpd.conf -> host special) file, since we want our machine to be an exception and will be served a special file namedlive-ISO
We want our machine to perform a netboot, so under the System
Boot Order tag specify only Network. We save the setting by clicking the OK button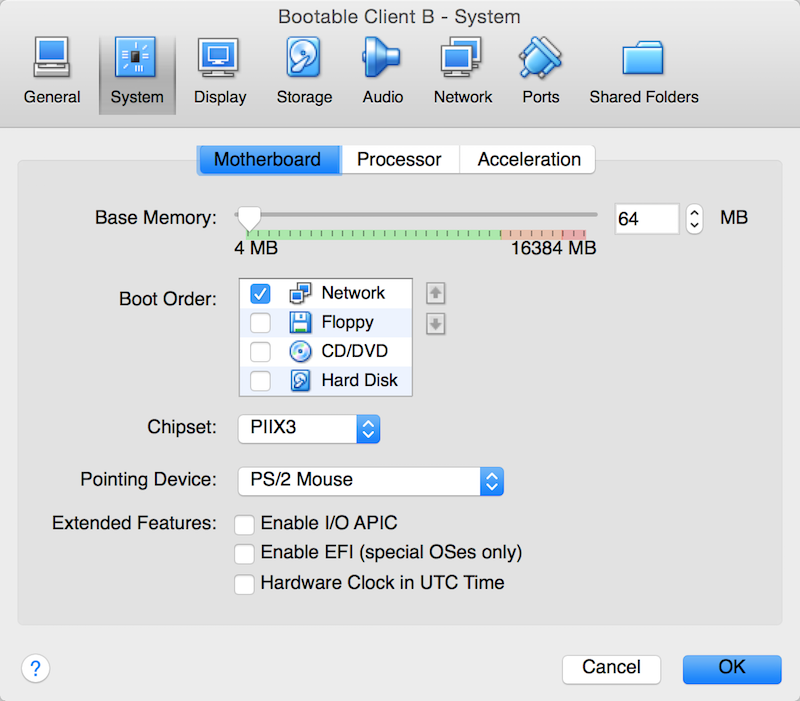
We run our BootableClient-a A and it get's it's IP address using DHCP server and simpleArbiter serves it the file we selected called live-ISO